Preserve Memories of Travel with 7 Travel Themed Crafts for Adults

Don't leave your memories of travel stuck on your phone or computer hard drive: you need some exciting ways to preserve them!
Everybody loves a new project, and the fun ideas below will allow you to relive the best parts of that amazing experience while getting all crafty at the same time.
(Honestly, most of these travel memories ideas can be even if you aren’t particularly crafty! They’re really accessible.)
You’ll find step-by-step instructions, product lists, and more help you complete each of the following projects so you can showcase your memories of travel to your guests.
These projects are guaranteed to start some great conversations about the places you’ve visited!
This post contains affiliate links. If you choose to purchase through one of the following links, I will receive a small commission at no additional charge to you.
Updated 4/2022 | Originally written 5/2015
1) Use your natural resources.

What a unique variation on most of the travel keepsake ideas out there!
Just grab a small amount of sand or dirt from each spot you're visiting and bag it up. When you return home, add it to a clear vase and label the destination and year.
Even if you return to the same area year after year (like us and St. Pete Beach or Edisto Island!), you can still try this memory of travel. Scoop a little bit from different areas of the beach and at different depths each year. You’ll find that sand from right under the tide line will look much different than the sand next to the boardwalk!
Or, you could layer rocks you’ve found on one trip with sand from the beach the next year with a bit of sediment from the yard of your rental house the next year. That would create some amazing variation in your finished product.
Disclaimer: make sure you do a little research before you haul the sediment home with you, as you cannot bring dirt, sand, or rocks through customs in certain places.
Also, never, ever take items from a protected environment or where there's signage indicating that you can't take the materials with you.
Materials needed
a 12” or taller glass jar or vase. One that has straight sides like this one will work the best, but you can also get one with a square shape like in the photo above.
a label maker or cutting machine (I have a Cricut that I love, but others swear by the Silhouette)
sand/rocks/dirt collected from your travels
Level of difficulty: beginner
Directions to make a layered travel memories vase
Carefully gather a cup or two of dirt, sand, sediment, or small rocks at your vacation destination, and place in a jar or bag.
When you return home, wash your selected glass jar or vase and thoroughly dry.
Using a funnel, pour in the sand, dirt, etc. into the bottom of your vase, then wipe off the glass inside and out.
Use your label maker or cutting machine to create a sticker that includes the destination and year. Place sticker on the outside of the vase so that the sediment or sand you placed in there is the backdrop.
Carefully tap the vase so that the sand, dirt, etc. has a smooth surface.
Display in your house!
Repeat for each destination you visit.
2) Pile it all together in a travel shadow box.


Unlike a junk drawer, a shadow box (like the ones above by Little Yaris Diary) takes a pile of random stuff and makes it look good. Save your ticket stubs, transportation passes, maps, and other ephemera--then arrange it in a shadow box.
Add some letters and stickers, and you've got a multi-dimensional vacation scrapbook that will double as a conversation starter and a wall decoration.
Materials needed
printed photos, receipts, menus, coins, small souvenirs, ticket stubs, and other ephemera from your trip,
travel themed stickers,
double sided tape
straight pins,
shadow box frame
Difficulty: intermediate (getting the layout just right can take some time)
Directions to make the travel shadow box:
On a flat surface, arrange your travel items so that they will fit in the size of your selected shadow box. You’ll likely want to mess with the items for a bit to find the best layout. Keep in mind that heavy items (like the masks in the sample picture to the above right) will need to be on the bottom, while smaller items like the travel stickers should be arranged so they don’t get lost in the over all picture.
When you’re ready to place everything, carefully wipe down the inside glass of the shadow box and dry thoroughly.
Using the straight pins and double sided tape, position each item in the shadow box. Use more tape than you think as gravity will be working against your final product. Reinforce thicker or heavier items with a straight pin or two.
Add any items that will be at the bottom of the frame and secure with tape.
Hang on the wall and get ready to get compliments on your creation!
3) Make a mini travel book.
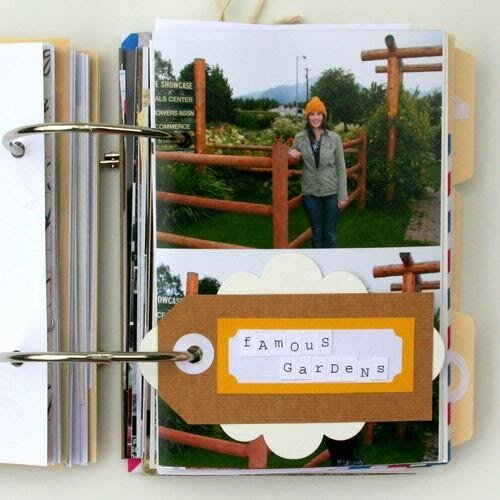

This is the easiest way to pseudo-scrapbook that I've seen.
If you’ve always wanted to create a cute travel photo book as souvenir, but you were overwhelmed with all of the papers, stickers, cut-outs, and more, you’ll love this project.
It really cannot be any easier, since hole punching printed photos and adding stickers is basically something you mastered in the 1st grade.
You've SO got this, even if you're not at all creative.
You could do one for each trip that you go on, or you could organize elements of your trips by theme.
Some scrapbook ideas for travel include favorite foods you’ve discovered on your travels, favorite beaches, best hotels, or favorite historic sites.
If you’re a parent, you could make a separate ring book for each child’s travels, adding to it as they get older.
Materials needed
Pre-printed photos (3x5)
stickers (there are so many cute ones for travel destinations!)
3x5 cards (these are great for separating sections of your book, while still being super simple to include. They’re thick enough to hold cards, journaling and more.)
Difficulty: beginner
Directions to make mini vacation scrapbook:
Gather your printed photos and organize them in a stack in the order that you’d like them to appear in your vacation scrapbook.
Add into the pile the card dividers to section off elements of your trip.
Using the 2 hole punch, carefully punch each of the photos and cards. They don’t have to be perfectly aligned as this gives some visual interest to the final project, but you do want to make sure you’re punching the holes far enough into the photos that the photo won’t rip. Also make sure you’re not punching directly over someone’s face or an important element in the picture.
Add stickers to the photos and cards. Ensure that stickers are acid-free.
Journal on the cards to include details about the people, places, food, and experiences in each section.
4) Create a full travel scrapbook.
Unlike the mini pseudo-scrapbook in entry #3, this is the real deal: papers and journaling and photos and stickers and maybe even some ribbon.
Of course, this is the most time consuming of the memory preservation ideas--and I have several abandoned scrapbooks in my house to show for it.
RIP Bahamas trip 2007, a scrapbook I gave up on after the 3rd day of the itinerary.
But if you love the idea of a unique, funky, journaled approach to your travel memories, a scrapbook or two might be the answer.
I'd strongly suggest mapping out the entire thing before you commit to see how much work stands in your way.
You'll be able to visualize the end goal before you even start, which reduces the likelihood that you'll have half-finished books hanging around like I do.
Should you use a travel scrapbook kit?
You can use a post bound book, a blank page A5 journal like in the example above, or purchase a spiral bound scrapbook.
Just make sure that you're using archival quality glue or tape, and acid-free papers to keep those pictures looking beautiful for as long as possible.
If you're pressed for time, but like the look of vacation scrapbook, you could buy a travel scrapbook kit that already has themed papers, quotes, and stickers all picked out for.
All you have to do is print out your photos in the necessary sizes, put them in the correct places, and slip the final pages into your now-completed vacation scrapbook.
Materials needed
scrapbook
pre-printed photos
scrapbooking papers
travel themed stickers
archival tape runner or glue dots
journaling pens
Difficulty: hard (there's definitely a need for creativity and lots of time to do this project correctly)
Directions to create a full travel scrapbook:
Jot down the pages you’d like to create, making note of the number of pages in your total scrapbook.
Take your printed photos, papers, stickers and other travel ephemera, and organize each page one at a time. When you’re happy with the arrangement on each page, secure everything to the page with your glue dots or tape runner.
Add in journaling notes with your archival pens. Include doodles or sketches if you’re artistically inclined.
5) Map it out, option A.

This travel map and photos is a great way to showcase memories of travel on a road trip or several vacations within the same country or region.
I love it as it provides context as to where each of your photos comes from, so it’s a geography lesson wrapped up in home decor!
You could, of course, do this with a world map, but then your space becomes very valuable around the edge.
Add pictures around the edge or little flags to each stop!
Materials
cork board
map of the country of your choice
pre-printed photos
fabric to cover the board with (optional)
string
Difficulty: pretty easy. This is one of those projects that could be done in an hour if you just took a cork board and tacked everything to it.
You could run into a higher level of difficulty if you wanted to wrap the board in a prettier fabric before pinning your elements to it.
Directions on how to create a travel map board:
Staple your map to the cork board, ensuring that it is centered.
Take each pre-printed photo and arrange it around the edge of the map where it is closest to the location that it was taken.
Use a pin to mark the location where it was taken.
Tie a small piece of string to the pin, then stretch the string to the corner of the photo. Secure with another pin or staple.
Repeat until all of your photos have been placed.
6) Map it out, option B.

If the small cork board in option A isn’t a bold enough statement, then this one is what you need for your house!
The modern metal map serves a center point here to your related photos.
You won’t be able to include as many pictures as in option A, but the overall effect is much more intense.
Materials:
multiple frames
pre-printed photos
ribbon (I’d suggest a neutral colored grosgrain ribbon in 1” or 1.5” width)
glue dots
hammer
nails
level
measuring tape
Difficulty: intermediate. When arranging multiple frames like this, it can be tricky to get just the right look without putting a millions holes in your walls.
Directions for the metal map wall hanging:
Determine which wall you’ll be using for this project and measure out the overall space you have to work in. While you can’t change the dimensions of the map, you can move the photos in closer or further away depending on your available space.
Put the photos in their frames.
Layout your entire collage on the floor, noting where each photo goes in relation to where it was taken on the map.
Hang the map first.
Carefully transfer each of the photos to the wall, keeping the dimensions and layout exactly as you had in your space on the floor. Check with the level to ensure that you’re not hanging anything crooked.
Stretch the ribbon from the edge of the metal map to each photo, using a small glue dot on the back of the frames to hold each end of the ribbon.
Stand back and admire your decor!
7) Rock on.

Using some craft rocks (or rocks you found on your trip!) and a Sharpie, add a favorite memory from your trip to the surface of the rock.
Layer them carefully with the wording facing out in a jar for an incredible centerpiece or add them to the bottom of a travel shadow box (shown in a previous craft idea).
If you went the way of putting the rocks in a vase, it would be quite the conversation starter for guests.
Plus, if you've got kids, you could really get them involved by drawing or painting pictures on each of the rocks. It's a great way to remember those small moments that make a trip--which are, sadly, often the things you forget if you don't have them written down somewhere.
Materials
Sharpie markers
large glass vase
smaller glass vase (it should be able to fit inside of the larger vase with enough room to put your rocks between them)
acrylic paint (optional)
Difficulty: easy. If you can write in a semi-straight line and pile rocks in a container, you can manage this project.
Directions on how to create a rock travel memory vase:
Gather your rocks from your trip or from the craft store. Wash all of them.
Using a Sharpie, pick one memory, phrase, or place and write it on the rock. Add doodles or paint if desired.
Put the smaller vase inside of the bigger vase.
Carefully, place each completed rock in the space between the two vases, ensuring that the writing faces out of the larger vase.
Continue to draw and write on your rocks until all of the space between the two vases has been used up.
All flowers to the smaller vase and set out your beautiful, one of a kind travel souvenir!
What's your favorite way to preserve your memories of travel? Which of these ideas would you like to try?
PIN ME!